Showing posts with label Sewing. Show all posts

Saturday, May 28, 2011

Tutorial - Sensory Blanket - Snuggie Remake

I have been doing a lot of reading lately on Sensory Processing Disorder, Autism and Asperger's. One of the things that really struck a cord is the characteristic of difficulty sleeping AND thrashing around during sleep. Both problems Frank has always had. I am forever wondering about his "rat's nest" of a bed... it's seriously like a small animal lair, with lots of trinket's and treasures tucked into the layers upon layers of bedding and pillows, with a small spot in the middle where he actually lays.


What I started noticing in my reading is that physical input is helpful, and by creating a cocoon or shell around the body, it can help with rest. One thing that can be done is to invest in a weighted blanket. Another idea is to sleep in a sleeping bag. We tried this with Frank, but he just slipped right out. So, I kept thinking and finally decided that perhaps modifying an existing item would work. I picked up a Snuggie (for under five dollars) at a Thrift Store. And in a few minutes, I refashioned it into something that Frank has found to be very functional and helpful for his sleep.


Supplies:
  • Snuggie type blanket
  • Sewing Machine (or hand held needle)
  • Pins & Scissors
  • 12" of elastic
  • Large Safety Pin or Bodkin (for threading elastic)

Photo from Snuggie website.


Instructions:

1 - Spread out the Snuggie, inside (seam side) up.


2 - Fold the sides over so that they overlap in the center and pin the top two layers (just the sides) from the bottom up.


3 - Stop pinning about 1/3 of the way from the top.


4 - Sew ONLY the side layers (now in the center front) together. You will have to push the back of the Snuggie out of your way. I just start at the top edge and scrunch the fabric up around my sewing machine as I go. Be patient and work the material smooth for about 10"-12" at a time. I find that my "three step" zig-zag holds up a little more on the stretchy knit, but a straight stitch of hand-stitch will work fine too.


5 - Lay the Snuggie out, and smooth the bottom edge. Center the seamed front, and pin the bottom edge.


6 - Starting about 8" in, sew across the bottom edge. Slow down and carefully work your way over the large lump in the center. Stop sewing about 8" from the other side.


7 - By leaving the two openings on the sides, you have created a double benefit... feet can stick out for walking, or just to get some cool air it gets a little warm.


8 - Look at the top hem. If it is closed, make a careful slit through one layer of the fleece, just large enough for the elastic to fit in.


9 - Using the bodkin or safety pin, feed the piece of elastic through the top hem.


10 - Secure the elastic at each edge of the top hem by stitching through all layers.


11 - Try it on for size. You may need to sew a little more (or less) of the front center closed, depending on how much wiggle room you like. My boys like there Snuggie's open about to their waist, which allows room to get in AND for air when they are a little warm.


At other times, they completely cover themselves, pulling the top edge over their heads.


My boys are in the four to five foot range of height, and this works well for them. If this were for someone taller and they want the ability to cover their head, a small piece of cloth may need to be attached to the top for a hood.


I have been quite delighted with this solution for my son. He has responded very well to his Snuggie, and is very protective of it... so much so that I had to make a second one for my youngest, because the eldest would never share his... at all. He even likes to wear it around during the day and will often bury himself on the couch in it. It provides him with an easy way to withdrawal when he needs some quiet time.

On a related note, we are currently working on creating a Weighted Blanket for my eldest... and I am sure that my youngest will then want one too. Of course, since my boys have grown up with fabrics and quilts, they want A LOT of fabrics in their blankets... so I think I will have to call ours Weighted Sensory Quilts. :D

As ever, please let me know if you try this project and how it works for you and yours.

Oh yes. And one other thing that has worked well for Frank is to sleep in a folding cot... without the inflatable insert. Again, it creates a restrictive, tight feeling around him. An idea I've had but have yet to implement is for him to sleep in a hammock... hung right in his room. I look forward to trying it for him. He just seems to sleep easier when he can bundle up tightly... but he is also warm-natured and doesn't want a lot of warmth, just restriction.

Wednesday, December 22, 2010

Gift Wrapping the Easy Way!

A few years ago I started collecting cute Christmas fabric on clearance. Then I sewed pillow-case style bags in all different shapes and sizes with ribbons attached (usually in the side seam). It makes wrapping SUCH a breeze!


The first year, when I made most of the bags, I figure it took me just as long as wrapping, but every year since, it's become SO PLEASANT to wrap gifts! Now, each year, I just add a few new bags (as needed) for new/different sizes/quantities.

I still plan to make some customized tags for our family members, for now, I keep the gifts in separate piles.


While it's too late for most of you to wrap in fabric this year... you CAN take advantage of after-Christmas sales starting this week. Scoop up that cute Holiday fabric for 75% off, buy several yards of ribbon (maybe on sale too) and then you'll be good to go for NEXT year. Oh yeah... remember to keep the fabric out when you pack up your decorations, so you'll be able to sew them and start wrapping early next season!


PS: My hubby likes the boys to have SOME presents to rip open, so he wraps a few for them. ;)

Wednesday, October 20, 2010

"Vampire Tooth" Tooth Fairy Pillow

Jack putting his First Tooth Lost in the brand new Tooth Fairy Pillow.


The mouth is open along the top for the tooth to go in. He was also quite specific about the placement and shape of the eyes.

The fang shaped "Vampire Tooth" is TOTALLY his pattern design. I had something MUCH different in mind, but it is his pillow.


On the back, we used a bit of blue and black batik fabric. Thanks to Becky for the fabric for this little project!

Sunday, August 15, 2010

Play, Play, Play!

Brother/Uncle's for morning swim.


Mom/Grandma's for afternoon BBQ.


Friend's for evening meal, playtime, and sleep-over.


Raid friend's sewing room for obsessive scrap sewing (these blocks are cut 3.5", the record holder (in this group) has 24 or 25 different pieces of fabrics.


Come to think of it, this may also be my record for the most blocks pieced in one sitting!

Crazy?

I think so!

But, oh-so-much-fun!!!

Wednesday, November 11, 2009

Coverstitching and Serging

I just spent (dare I admit it) over 2.5 hours remembering how to switch my serger from a regular Serge stitch to a Coverstitch. Previously, I've only coverstitched in classes and that was well over three years hence. While I still have the manual, it's a little tough when for each of the 13 steps, you have to try to figure out which switch/cover/thing they are telling you to move.

When I finally got it working, I wasn't *thrilled* with the results, but was glad to get the hem done. Then, I thought it would be oh-so-simple to return my serger to it's former serging state. Sadly, after five re-threadings, I sent my friend home (without her dresses sleeves finished) and told her I'd keep working on it. :P


The good news here is that I cleared off (most) of my sewing room surfaces AND got my hands on fabric again. I always love the hum of a machine with the feel of fibers slipping through my fingers... and once I get a taste of it, I remember how therapeutic it is for me and find myself returning to the fabric and machines.

Wednesday, October 21, 2009

Making a Mermaid Tail

I just saw this wonderful little tutorial on making a mermaid tail and had to share.

Photo from Elegant Bloggery

It's times like these that I wish we had a daughter!

-------------------------------------

5:53pm - HEY!!! I *JUST* realized I cou
ld make the boys MerMAN fins!


Give them a pitch fork and crown so they could be "King Triton".


In the background, I hear Tom saying "it was at that point, Your Honor, I was forced to kill her..."

Thursday, August 20, 2009

Leapfrogging

Yesterday, after a full day of Grouchy-ness on my part AND being a Certified Crab Apple (also on my part), my hubby, who had already cleaned house, sent me out on my own, did laundry, cooked repeatedly and totally kept the house running, told the boys that "Mommy is going up to her Sewing Room while we watch a movie together." Even when I can't figure out what I need... he knows!


I spent the first 25 minutes cleaning up the sewing room (and made a marked improvement in the room). Then, in just 75 more minutes I finished up this project, which I started TWO YEARS AGO (when I cut it). TWO MONTHS AGO, I assembled the parts (insides with pockets, outside with padding, straps). Last night I quilted and assembled it. I learned/remembered two things:
1 - I must sew more often... I love it!

2 - My current quilting setup is not as desirable as the one I would like to have... by way of a Juki sewing machine. The biggest problem (at least for small projects like this) is not the size of my machine, but the fact that the machine is slightly higher than the surrounding table-top. This is troublesome because I found a great tool to use (Quilter's Halo, by Sharon Schamber) but it works better when the area around the needle is flat. Hmm...
So. I need to find time in my busy schedule to make sure I am spending time each day (because weekly goals seem to disappear) in my sewing room... which probably means I will sacrifice computer time.

Anyway. Wanted to share a quick project completion in quick blog post.

Monday, June 29, 2009

The Best Rags, Ever!

Yesterday I made the Best Rags Ever!


I cut up an old, thrift-store towel...


and then quickly finished the edges (I serged them, you can zig-zag too). Lastly add a big letter "R" (for Rag) with a permanent marker.

Now enjoy. Frank was delighted when he found these new towels (he didn't see me make them) this morning. He thought they were "awesome because they have a happy, smiley face on them."

Friday, June 26, 2009

Ladybugs

Saturday (June 13th) I played around and made two delightful and "oh-so-cute!" Ladybug items.

I planned to make another Baby Shower Minkie-Taggie-Lovey-Blankie-Thingy. While looking for ideas, I found this cake. I really liked the angle of the photograph and wound up creating this ADORABLE item:


One of the fun things about this applique is that all the fabric for the background and bug is super-soft Minky... except for the antenna. They are made from an old (clean) shoelace, couched down. I really appreciate the texture difference (both visual and tactile) that the shoelace creates.


In addition, the gift was for a Baby Shower. The lady hosting the shower has had a downfall of bad luck this month, and when I saw her the day before, I could see the poor gal was seriously overloaded. So, I offered to make the Party Cake. I found this website with amazing cake ideas and photos (Coolest-Birthday-Cakes.com). I looked through dozens of ideas before basing my shape on this.


My whole life I've made birthday cakes. Actually, I cried on Jack's last birthday (on the phone, with my Mom, at the store) because I was BUYING him a store-bought cake. Frank was sick. I was exhausted. Still. Crying over a store-bought cake. It goes to show you HOW IMPORTANT it is to me that I make birthday cakes for my family and friends! In all my years of playing with decorating tips and looking through Wilton Year Books, somehow, I never picked up a magnificent tip.

When finishing the frosting, dip the blade in hot water, smooth frosting, wipe off excess and repeat.

I've never taken a cake decorating class, just looked at books and came up with ideas. Mostly, I want a cake that tastes amazing, and looks fun, but isn't "too much" work. I enjoyed the Coolest-Birthday-Cakes.com because it was full of Non-Threatening creative ideas by the common cooks like you and I.

Still, with that one little tip (plus freezing the cake between steps), I was able to create this very nice looking cake. By the way. If you are wondering. Jack helped me with the process of creating both these items... thus the "lined up on one side and zig-zaggy on the other" spots. Jack and I made the eye whites and mouth out of taffy, warmed slightly in the microwave, and then hand shaped, like Silly Putty. Putting the decorations on was Jack's big part of this cake. :D

I would love to hear the music to go along with this fun song:

Hello Ladybug

Notes: words and music by Malvina Reynolds; copyright 1972 Schroder Music Company, renewed 2000. a.k.a. "Ladybug."

Hello ladybug, little lady, ladybug
Hello ladybug, my little friend
Eating up the crawlers that eat up my roses
Fly around ladybug, come back again.

Hello, wiggleworm, little wiggle, giggleworm
Hello, wiggleworm, my little friend
Churning up the ground so the roots can go down
Wiggle, wig, wiggleworm, come back again.

Hello buzzy bee, little buzzy, fuzzy bee
Hello buzzy bee, my little friend
Carrying the pollen that makes food and flowers grow
Buzz around, buzzy bee, come back again.

Hello ladybug, little lady ladybug
Hello ladybug, my little friend
Eating up the crawlers that eat up my roses
Fly around ladybug, come back again.


Now. One more fun Ladybug thing for you. I found this poem that reminds me of how content we all can be in our lot in life:

Happy to Be Me- a Ladybug

I'm a ladybug
nothing more
but I'm happy to be me,
so free,
with so much beauty to see...

I'm red with black spot
found in field,
meadow,
or flower pot...
on blade of grass,
tree limb
shrub or flower,
perhaps even on the Eiffel Tower!
hill or dell,
by a stream
in wood serene-

I've been to so many places
it's hard to tell...
I'm very little
but please do not belittle,
just content to be a creature of this earth,
isn't that a measure of worth?

-Marie Lawrence

I hope you're having a great weekend! This creative break was wonderful, but now it's time to hit the books again! :D

Friday, April 17, 2009

Baby Gift - Ribbon Tag Lovey Blanket

Q: When you hand a baby a stuffed animal, what's the first thing they do?

A: They flip it over to suck on the tag!


Around the time Frank was born, a Genius Lady in Gilbert, Arizona started creating Taggies. Since that time, I've created many similar variations myself, to give to my own children and others.

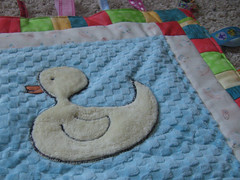
Yesterday I created this variation for Nicole's baby, due on with her third girl on the 28th. Her family has been calling this little one "Ducky" and Nicole likes bright colors.


I was very pleased with the brightness of this, as well as the baby-esque colors, without being Over-the-Top Pink and Pastel.


The duck is my own sketch and was appliqued with my own method that is similar to Angie's (Lunch Box Quilt) applique method.


As always, whenever I sew with Minky, I never want to give the finished item away... they are just so cuddly and soft! This item also has some small bits of flannel around the edges on the back... just a little more tactile sensation. In addition, the beak is made from a fun bright, woven fabric from Heather's Scrap Bag. The border fabrics are from Connie at The Quilter's Outpost in Payson, Arizona. The baby fabric on the back came from Nancy Haldeman. And the ribbons came from my ribbon bag... which I keep stocked with items appropriate for this very gift item. Basically, the whole project came out of my sewing room in under 3 hours, and with lots of thought given to the people who have shared scraps and tidbits with me over the years. Thanks to all! :D

If you are interested in making a similar snuggly item, check out this tutorial.

Monday, April 13, 2009

A Knight and His Squire

We made Jack The Greatest Costume last month for our Annual Pilgrimage to the Arizona Renaissance Festival. I've told some of you about it, and some have seen it in person, but I have hear cries from far away for pictures to be posted on the website. And so, without further ado, here is Sir Jack...


As I said, we've gone EVERY year since before the boys were born, but never had they had so much as a hat. Well, I decided, THIS YEAR, was the year to change that. I took a duffel bag of fabrics with me to Arizona to finally make the boys Renaissance Costumes.

Jack wanted to be a knight, with chain mail. Knowing this, I also brought along the template from last summer's Sports Camp T-Shirt Painting. Jack had been asking for his own Red Dragon ever since I painted Frank one.

I had this idea for Jack's costume. My Mom and I cut the top pieces. I sewed the tunic. Mom sewed the chemise. Mom's friend, Melinda, sewed the "Chain Mail". Then, I added the pants.

We never got around to making Jack a hat... and he never seemed to notice the deficiency. I do have a hat in my mind for him, I just have to put my hands on "the right" fabrics.


Frank, on the other hand, told me "Mom, I won't wear a costume; just make me a Fancy Hat."


Frank was right. Frank liked his hat, wore it a time or two, and has moved on.

I'd already realized that Frank's lack of interest in costumes was why I'd never yet sewn them Renaissance Costumes. Jack loves to dress up though, so we were able to really focus on his costume, and make Frank a quick hat with a fancy pin and feathers.

Here, are the boys with my brother. I've told many of you about my brother, and his hair (which is longer than either of his sister's), and so, here is a rare picture Ivan for you.


And that, is that.

Can you tell that I'm catching up on rest (and computer stuff) today? I did about 45 minutes of cleaning in my bedroom this morning and have spent the rest of the day (save eating quick snacks) on the couch with my feet up. It actually FEELS GOOD to just set and rest! :D

Friday, October 31, 2008

Halloween Check In

Costumes completed!

YEEEEEAAAAAAAAAAAAAAAAAAAAHHHHHHH!!!

This morning I made the Satchel Bag for Jack, finishing it minutes before leaving for our playgroup's Halloween Party.


Isn't it funny how all the little kids are looking every which way? They had no clue what they were doing there, but I was pleased with how well they were sitting. I wished I'd had my voice to tease them into some smiles, but it's still fun to see them doing their own things.

Here are the boys with our homeschooling-neighbor friends.


The Monkey costume is from Old Navy. I was in charge of the other four costumes... getting Amy's help with the gloves and hats for the two Ash costumes, and teaching her while making the Witch. That was sure a lot of sewing to get through!

I'm most pleased with Jack! He looks so stinkin' cute in his Indiana Jones costume!


I bought each of the boys a surprise accessory which was waiting for them this morning... A Light-Up Crystal Skull for "Indy" and Pikachu for The Pokemon Trainer! I told Tom that "costumes are all about accessories... what's Vader without his chest box, belt or light saber?" Tom smirked.

Even with the $15-20 each on the boys "accessories" I made both costumes for under $50. We couldn't have bought one of these costumes for that price! I'm so pleased with myself... and modest too!!! ;P

Frank was so happy with his Pikachu!


I'll get some better costume pictures of the boys a little later, especially all the details that you can't see here on Jack's costume, but for now, I thought I'd share the beginnings of our fun Halloween. :D

Thursday, October 30, 2008

An Update from the Nearly-Mute Girl

I'm feeling better still today... not so congested.

Tom took yesterday off, but today he's not had ANY calls... so, he's been able to spend the whole day playing on the computer... I mean resting!

Jack and Frank seem to be fine. Hard to keep tabs on their rambunctiousness while nearly Mute myself.

As of this morning, I've finished sewing FOUR Halloween costumes (pictures of all the kiddos will come after they wear them tomorrow) and am about 1/4 done on the second sock to make my FIRST PAIR of socks.

Also, I made my family's Zucchini Brownies Recipe and mixed in some chips / Reese's Pieces. They all sank to the bottom! My neighbor told me I should bake 1/2 the batter for 5-10 minutes, and then sprinkle the goodies on, and top with rest of the batter. I guess every so often, I need to have a cooking attempt flop! Oh well! You live and learn and they still taste good.

I'd thought about carving our pumpkin this afternoon, but it's a VERY tall and skinny pumpkin and I just don't feel like I have the energy at the moment, so, we'll see!

How did October get over? I have so many fun Halloween-y things to do and I did so few of them. I never even got out my Halloween decorations, and I know right where they are and I can reach them... it just didn't happen. And quilting, I have plenty of projects to do for Halloween that involve sewing... but wait, I did sew, and sew, and sew! Costumes times four kids! Se-la-vi (did I spell that right).

Oh yeah, and today's Heather's birthday! I hope you're having a GREAT DAY!

HAPPY BIRTHDAY HEATHER!!!

Suzy :D

Tuesday, October 21, 2008

Costume Update - Indiana Jones Coat

So. Since I constantly hear Jack wandering around "singing" the Indiana Jones Theme Song, I decided to offer up to him the option of being Indy for Halloween. Of course, he jumped on it!

He already has an Indy-Like hat, plus a whip (Tom made out of a piece of rope to stop Jack from hitting things with his leather belt). Pants aren't a problem. I still need to find a plain button-up shirt. The "biggie" was the coat. I decided to find a leather coat at a thrift store and then to make a satchel out of some canvas/denim-type fabric. Here's the main reference picture I'm using for the project...


Here's the leather coat I found at a Goodwill in California.


I paid just $5 for the coat! As you can see... it's big enough to fit me (and I did think about keeping it for me, because it's a nice coat!) Instead, I found Jack's "Lumberjack" Fleece Coat.


Which is a little big for him (that's okay though, if I'm going to the work of making him a leather coat, it would be nice if it fit more than a year!)

Here's a reference of the Lumberjack coat that I made the pattern off of, and the Leather coat to be cut up. As you can see, it looks like there will be plenty of material!


Before cutting anything out, I removed the front placket, zipper, collar, cuffs, and waistband.

This should give you an idea of how the pattern pieces are cut out of the coat.


Then. I started cutting.

Foolish me, today, I started sewing but didn't take any pictures of the pieces pre-assembly!


Yesterday, I watched my friend's kids for something like 7 or 8 hours. Today, she took my boys for 5 so I could sew. She's also planning to watch them again tomorrow morning. Here's what I accomplished so far today...


Shoulder seams, collar, zipper, armhole seams, fake pocket flaps.

Indy's coat has patch pockets with flaps. The coat I'm using had side-seam entry to it's pockets. I cut the front pieces so that I could use the existing pockets. I had everything else done today and Tom came in. I ask his opinion on adding the fake pocket flaps. As you can see...


...we decided I should put them on.


The pocket flaps "only" took about 1 1/2 hours to design, sew, and attach (my one broken needle (so far) happened while attaching the first pocket flap).

I was going to modify the collar to a smaller, size, but decided to use the original, and just enlarge the neck-line. I've never seen it before, but the collar had an extra "facing?" piece on it... I'll have to get a better picture.

In any case, it made modifying the original collar shape a very challenging prospect, so, I just used it as it was. Which means it has a nicer patina and character and all the original stitching on the points... which I like.

Here's a snapshot of the inside of the coat. I've labeled some of the parts, to make it easier to see what's what.

I found several things about the original interesting, and I'm trying to recreate them. One thing was that they snipped the armhole seams to ease the leather before topstitching. I did that too, but whenever a seam intersected, I just let that area lay straight, instead of folding it back and creating a lot of bulk.

Tomorrow, I'll sew the side seams, finish the lining, attach the lining, waistband, turn it right-side-out, hand sew lining, topstitch zipper facing down.

I'm very pleased with how all of this is going! So much so, I think I'll ask Tom to make dinner and I'll head back up to My Studio! :D